


Passkeyで実現する次世代ログイン体験|パスワードレス認証を試してみた
はじめに
こんにちは、エンジニアの瀧口です。
今回は、近年注目を集めている「Passkey(パスキー)」についてご紹介します。
パスワード不要の認証方法として、AppleやGoogle、Microsoftといった大手も採用を進めているPasskey。
ユーザーにとってはログインがより簡単・安全になり、開��発者にとってもパスワード管理の負担が減るというメリットがあります。
この記事では、Passkeyのサンプルを実装してみたいと思います。
Passkeyとは
Passkey(パスキー)は、パスワードに代わる新しい認証技術で、FIDO(Fast IDentity Online)アライアンスが提唱する標準規格に基づいています。
従来の「ユーザー名+パスワード」の組み合わせではなく、公開鍵暗号方式を使って本人確認を行う仕組みです。
Passkeyは、ユーザーのデバイス上で生成された「秘密鍵」と、サーバーに登録された「公開鍵」のペアを使って認証を行います。ログイン時には秘密鍵を使って署名が行われ、その署名を公開鍵で検証することで本人確認が完了します。
これにより、パスワードを入力したり、盗まれたりするリスクがなくなり、フィッシングやリスト型攻撃に対して非常に強いセキュリティを実現できます。
また、Passkeyは生体認証(指紋や顔認証)やPINコードなど、ユーザーが普段使っている認証方法と組み合わせて利用されるため、セキュリティと利便性のバランスが非常に優れています。
プロジェクトのセットアップ
今回のサンプルアプリでは下記の構成で実装したいと思います。
- ランタイム: node v22
- フロント: Nuxt 3
- サーバー: Nitro(h3ベースのNuxt 3のサーバーエンジン)
- データベース: SQLite3
- ライブラリ: SimpleWebAuthn, better-sqlite3
それでは、下記のコマンドを実行してプロジェクトをセットアップしましょう。
# Nuxtプロジェクトを作成
$ npx nuxi init [プロジェクト名]
$ cd [プロジェクト名]
$ npm install @simplewebauthn/server @simplewebauthn/browser better-sqlite3

# SQLite3データベースを作成
$ sqlite3 db.sqlite "CREATE TABLE users (id TEXT PRIMARY KEY, email TEXT UNIQUE, credential_id BLOB, public_key BLOB, counter INTEGER);"

# Cookieの暗号化キーを.envファイルに書き込む(32文字のランダム文字列を設定)
echo "NUXT_SESSION_PASSWORD=CGUqX4qh567v1VhVdyzxOQ3GMmGTGuWi" > .env

# 開発用サーバー起動
$ npm run dev
下準備
DBアクセス周りを準備
ユーザの登録や認証時などにデータベースを読み書きするので、読み書き用の関数を用意します。
// server/utils/user.ts
import path from 'node:path'
import Database from 'better-sqlite3'

const dbFilePath = path.join(process.cwd(), 'db.sqlite')
const db = new Database(dbFilePath, { fileMustExist: true })

type User = {
  id: string
  email: string
  credential_id?: string
  public_key?: Uint8Array
  counter?: number
}

export const getUserByEmail = (email: string): User | undefined => {
  return db.prepare<string, User>('SELECT * FROM users WHERE email = ?').get(email)
}

export const saveUser = (user: User): void => {
  db.prepare(`
    INSERT OR REPLACE INTO users
    (id, email, credential_id, public_key, counter)
    VALUES (?, ?, ?, ?, ?)
  `).run(
    user.id,
    user.email,
    user.credential_id,
    user.public_key,
    user.counter,
  )
}
セッション周りの準備
サーバー側にプラグインを作成し、イベントハンドラ内で毎回 useSession() をしないでもセッションにアクセスできるようにH3EventContextを拡張します。
// server/plugins/session.ts
export default defineNitroPlugin((nitroApp) => {
  nitroApp.hooks.hook('request', async (event) => {
    event.context.session = await useSession(event, {
      password: process.env.NUXT_SESSION_PASSWORD || '',
      cookie: {
        maxAge: 60 * 60 * 24, // 1 day
        secure: false,
        httpOnly: true,
      }
    })
  })
})

type sessionData = {
  userId?: string
  challenge?: string
}

declare module 'h3' {
  interface H3EventContext {
    session: Awaited<ReturnType<typeof useSession<sessionData>>>
  }
}
これで、Nitroのイベントハンドラ内で下記のようにセッションにアクセスできます。
export default defineEventHandler(async (event) => {
  // セッションデータにアクセス
  const { foo } = event.context.session.data

  // セッションデータの更新
  await event.context.session.update({ bar: 1 })

  // セッションのクリア
  await event.context.session.clear()
})
保護されたページを用意する
このサンプルはPasskeyを用いた認証のサンプルなので、ログイン後にしかアクセスできないページを用意します。
とりあえず GET /protected のパスに雑につくります。
// server/routes/protected.ts
export default defineEventHandler((event) => {
  return 'This is a protected page!'
})
この状態でブラウザでアクセスしてみると、
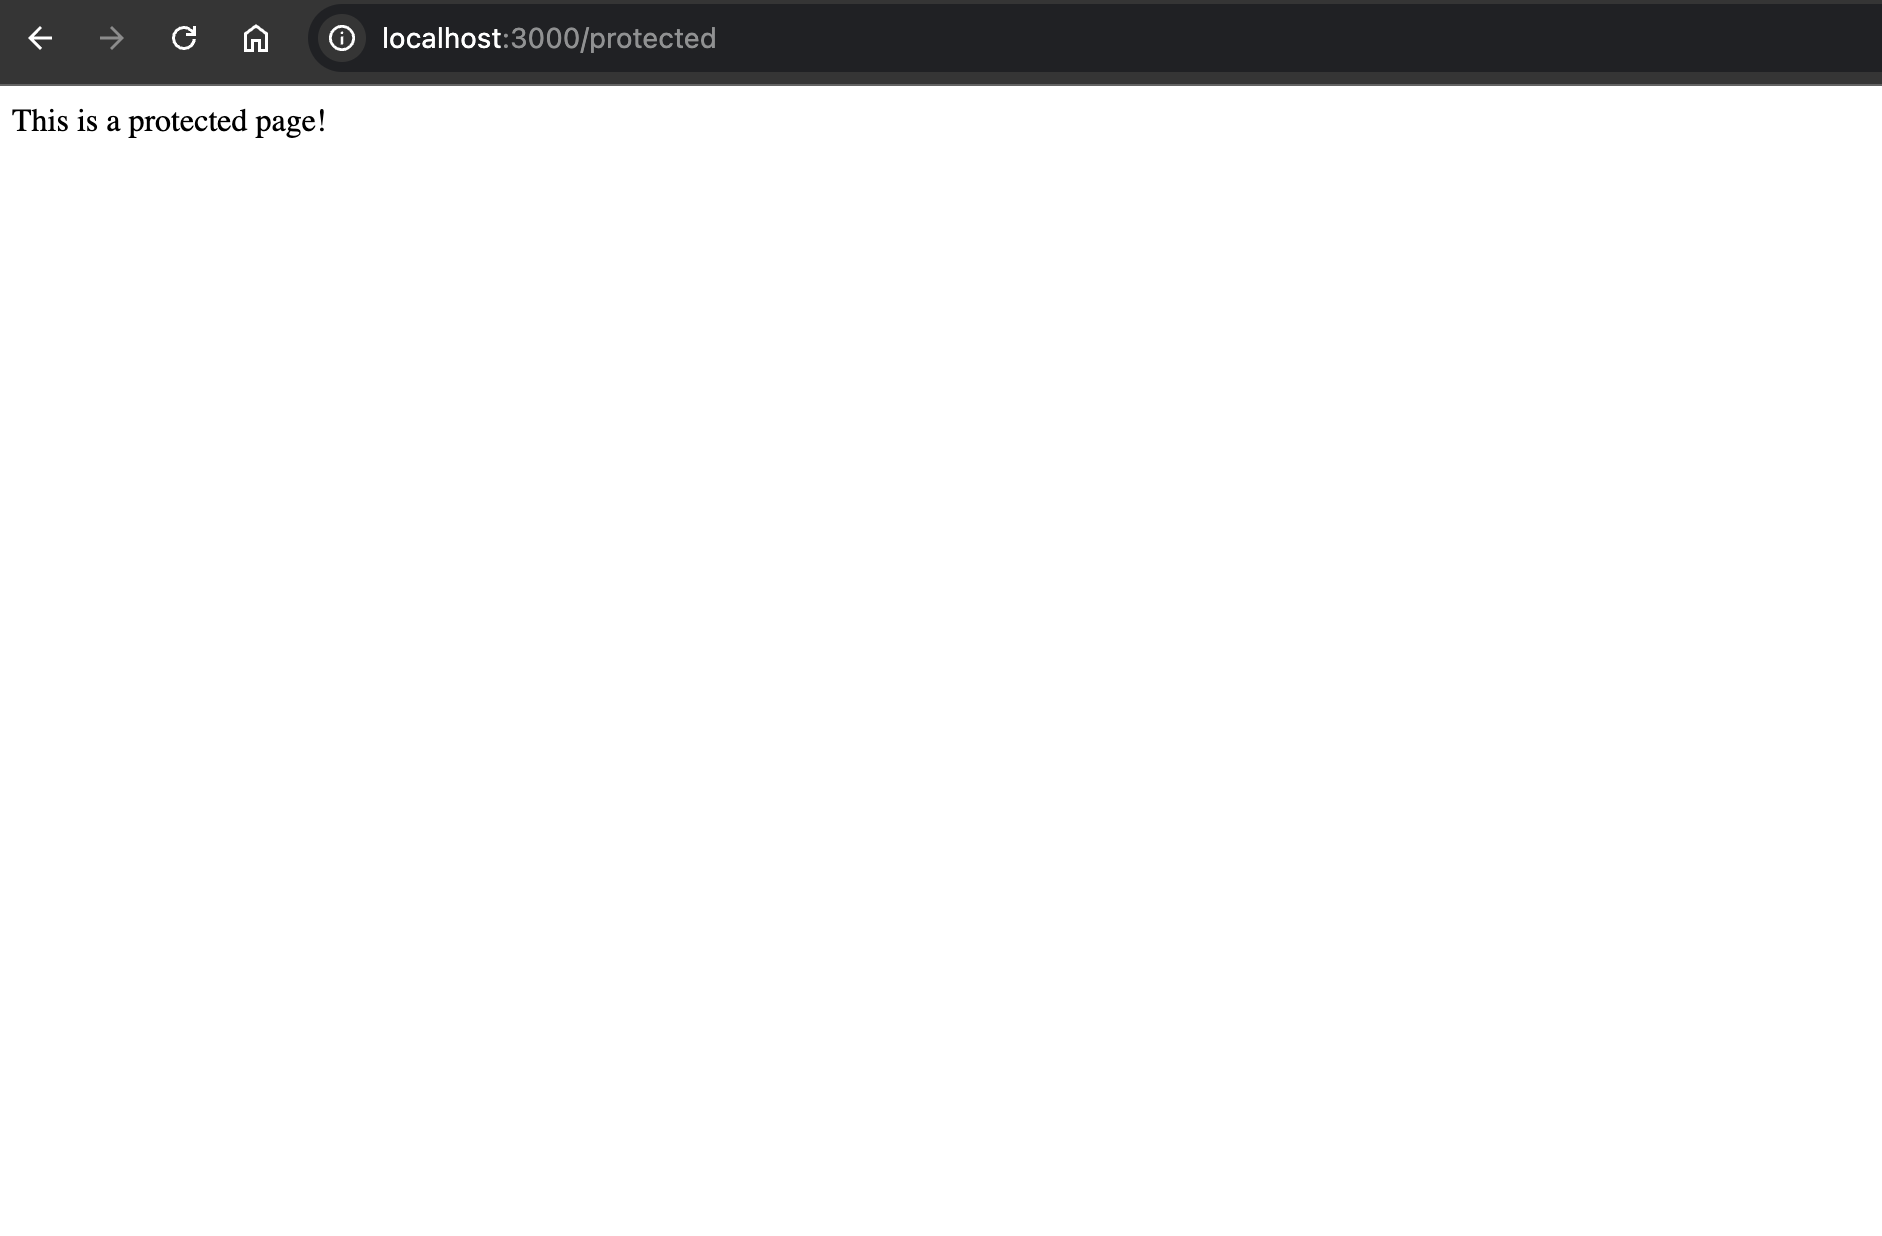
まだログイン状態のチェックを入れていないのでそのまま表示されます。
次にここにログイン状態をチェックするコードを追加します。
// server/routes/protected.ts
export default defineEventHandler((event) => {
  // 未ログインの場合はトップページにリダイレクト
  if (!event.context.session.data.userId) {
    return sendRedirect(event, '/')
  }

  return 'This is a protected page!'
})
ログイン完了後にセッションにユーザIDをセットするので、セットされていなければ未ログインだと判定できます。
この状態で再度アクセスしてみると以下のようにトップページにリダイレクトされます。

これで保護されたページの準備は完了です。
Passkeyの実装
下準備を終えたので、ここからPasskeyの実装に入っていきます。
PasskeyにはユーザがPasskeyを登録する登録フローとPasskeyを使ってログインする認証フローの二つがあり、これらを実装する必要があります。
登録フロー
登録フローは大まかには下記のような流れになります。
Registration Flow
https://w3c.github.io/webauthn/#sctn-api
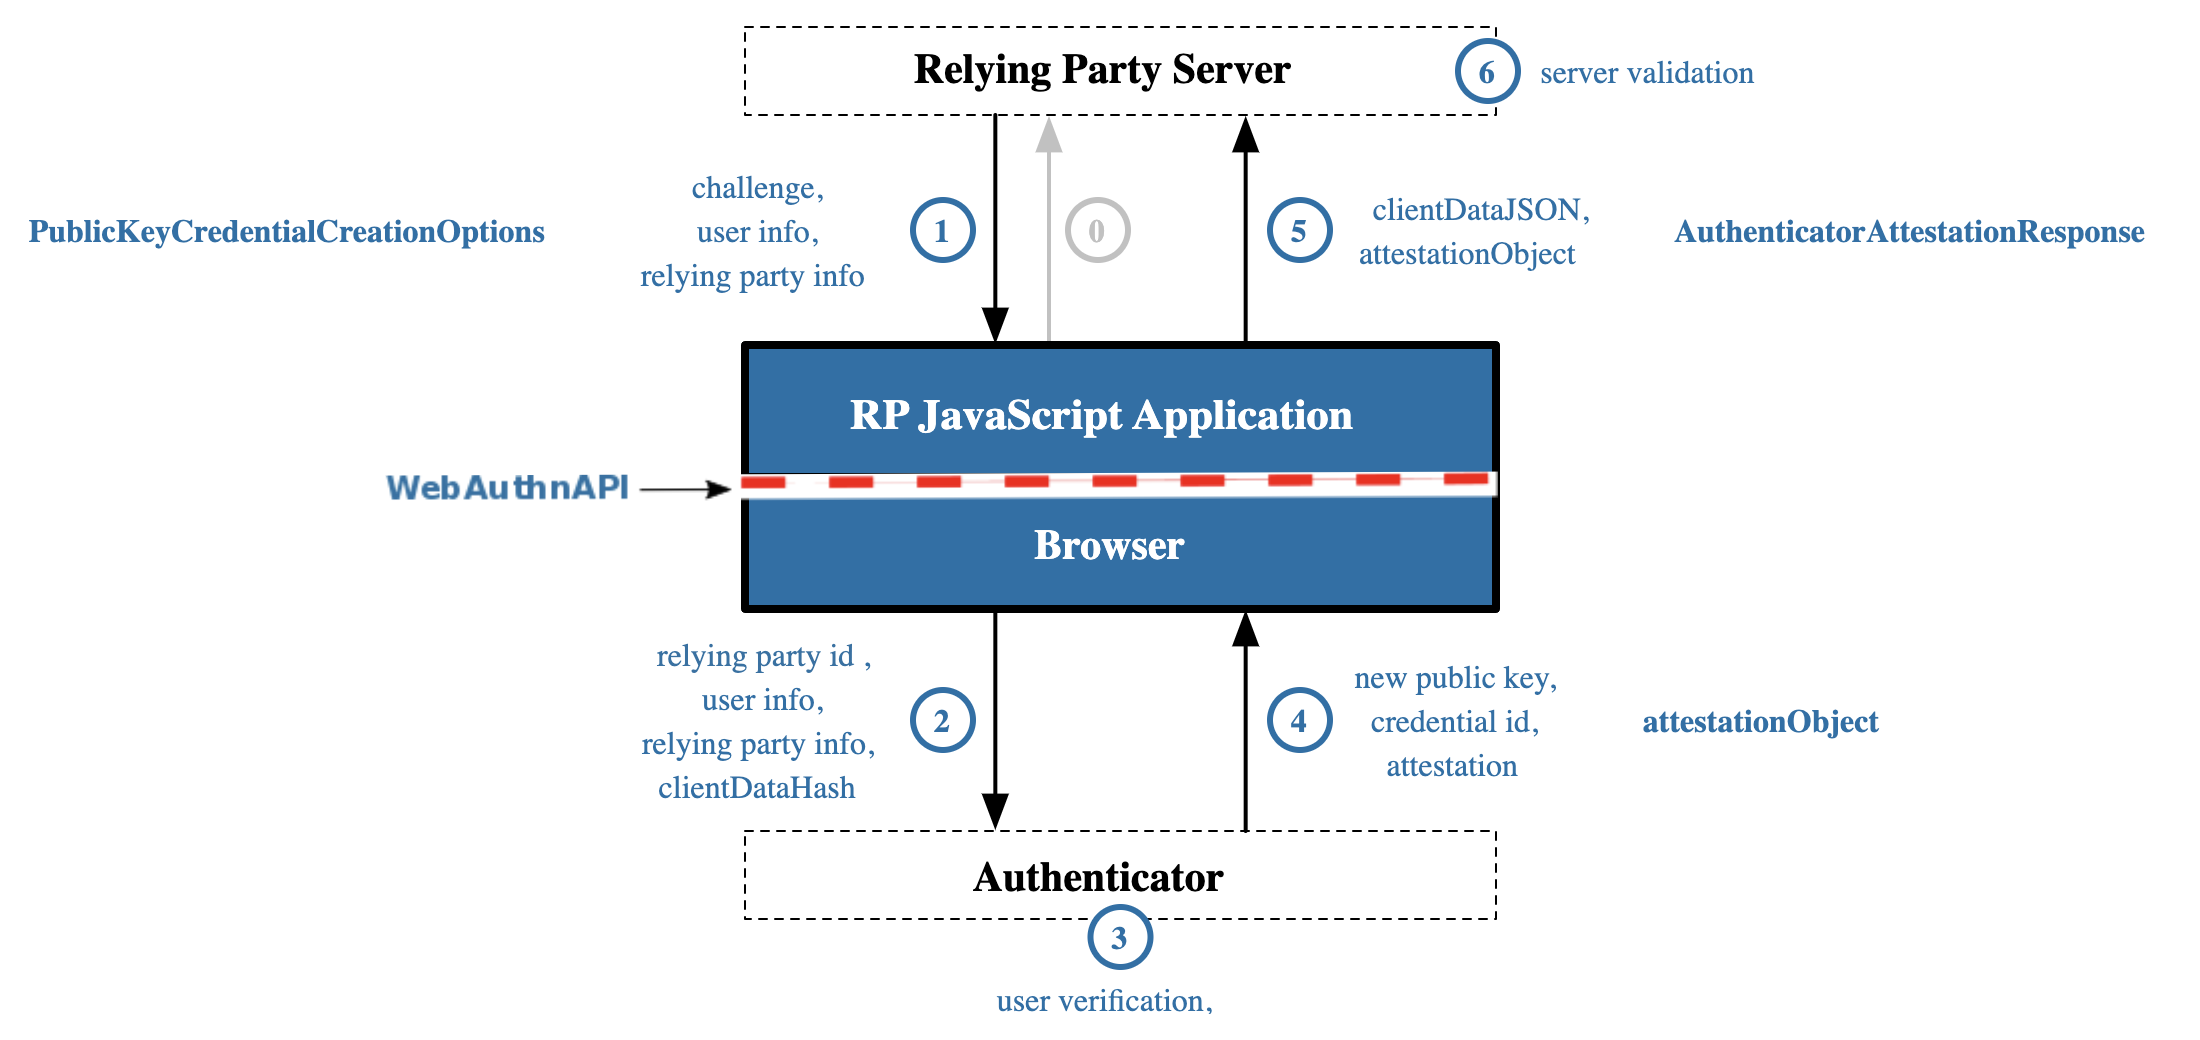
- ユーザーがサインアップボタン等をクリックして、登録フローがスタートします
- サーバーはクライアントに
PublicKeyCredentialCreationOptionsを返します - クライ��アントは受け取った
PublicKeyCredentialCreationtOptionsを使ってWebAuthn API経由で認証器を呼び出します - 認証器はユーザーの認証(生体認証など)を実行
- 認証器はクライアントに
AuthenticatorAttestationResponseを返します - クライアントは受け取った
AuthenticatorAttestationResponseをサーバーに送信します - サーバーは送られてきたを
AuthenticatorAttestationResponseを検証し、問題がなければ公開鍵やcredential_idなどを登録(保存)します
上記フローのうち実装する必要があるのは主に 0, 1, 5, 6 の部分になります。
2, 3, 4 についてはWebAuthnAPIを呼び出して認証器側での処理となるためRP側では呼び出し部分の実装だけします。
それでは、順番に実装していきましょう。
クライアント側(RP Javascript)
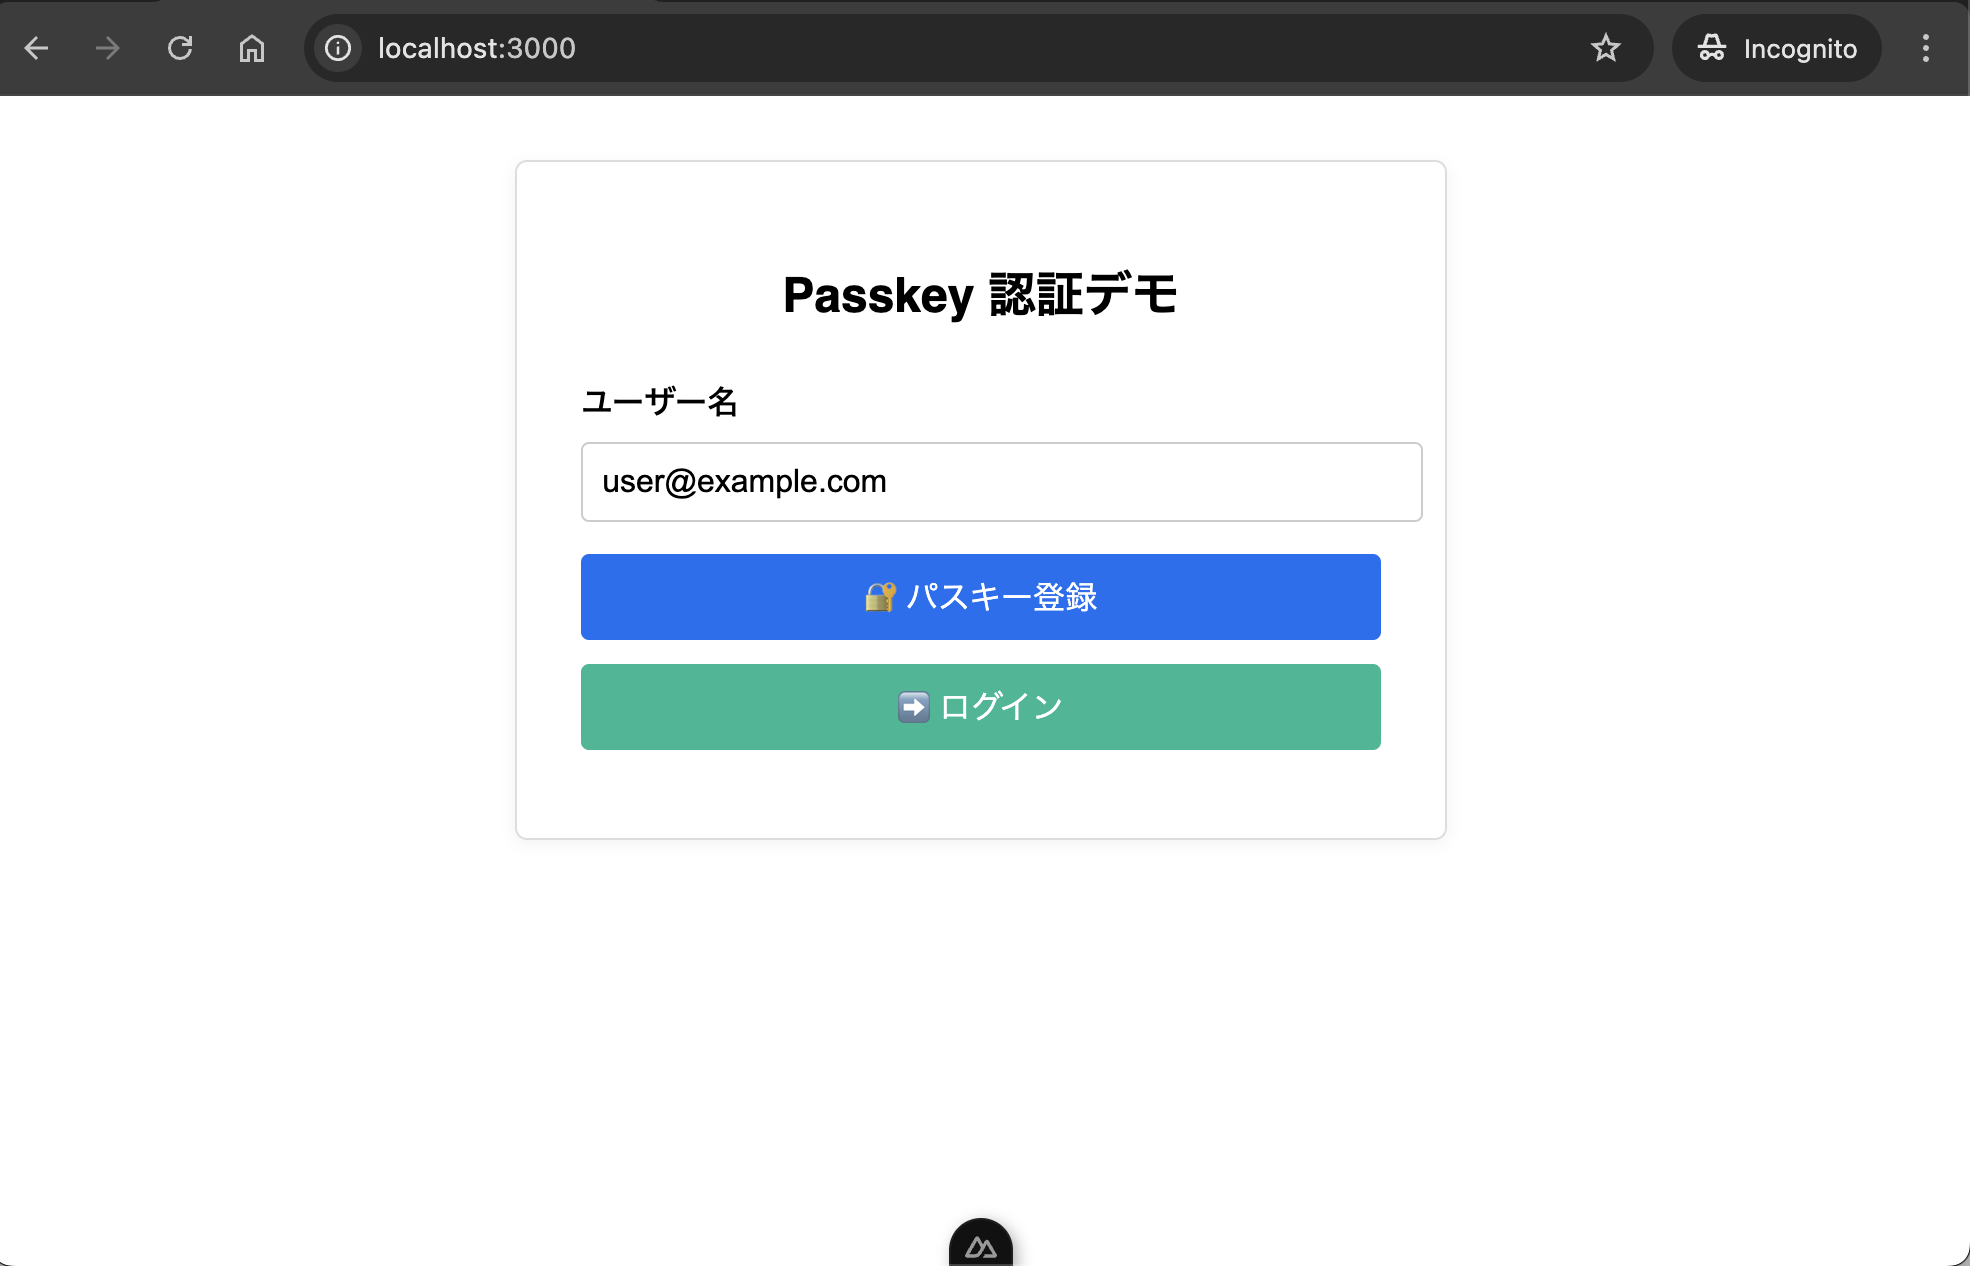
まずは、Passkeyの登録を開始するための画面を用意します。
今回はシンプルにするために app.vue に直接処理を書いていきます。
// app.vue
<script setup lang="ts">
import { startRegistration } from '@simplewebauthn/browser'

const username = ref('')
const isUserNameValid = computed(() => username.value.trim().length > 0)

const register = async (email: string): Promise<void> => {
  // PublicKeyCredentialCreationOptionsを取得する
  const options = await $fetch('/api/auth/register/options', {
    method: 'POST',
    body: { email },
  })

  // WebAuthnAPI経由で認証器に認証情報をリクエスト
  // startRegistrationは内部でnavigator.credentials.create()を呼び出す
  // 認証器はユーザー検証(本人確認)を行う
  const attestationResponse = await startRegistration({ optionsJSON: options })

  // attestationResponseを送信して登録する
  const { verified } = await $fetch('/api/auth/register/verify', {
    method: 'POST',
    body: {
      email,
      attestationResponse,
    },
  })

  // 結果を表示
  alert(verified ? '登録成功' : '登録失敗')
}
</script>

<template>
  <div class="container">
    <h1 class="title">Passkey 認証デモ</h1>
    <label class="label">ユーザー名</label>
    <input
        v-model="username"
        type="text"
        placeholder="demo@example.com"
        class="input"
    />
    <button
        @click="register(username)"
        class="button register"
        :class="{
          disabled: !isUserNameValid
        }"
        :disabled="!isUserNameValid"
    >🔐 パスキー登録</button>
  </div>
</template>

<style scoped>
// 省略
</style>
簡単に解説すると、
- ユーザ名(メールアドレス)を入力する
- パスキー登録ボタンを押して
register()を実行 - サーバーに
PublicKeyCredentialCreationOptionsを要求する - サーバーから受け取ったオプションを使って
SimpleWebAuthnのstartRegistration()を呼び出すstartRegistration()は内部的にはnavigator.credentials.create() を呼び、認証器に認証情報の作成をリクエスト- 認証器により認証が要求されるので認証する
- 認証が通ると
startRegistration()がAuthenticatorAttestationResponseを返す
- 受け取った
AuthenticatorAttestationResponseをサーバーに送信して検証と登録をしてもらう
という処理の流れになっています。
サーバー側(RP Server)
次にサーバ側で PublicKeyCredentialCreationOptions を返すエンドポイントを実装します。
今回は POST /api/auth/register/options というパスで作成します。
// server/api/auth/register/options.post.ts
import { randomUUID } from 'node:crypto'
import { generateRegistrationOptions } from '@simplewebauthn/server'
import { isoUint8Array } from '@simplewebauthn/server/helpers'

export default defineEventHandler(async (event) => {
  // リクエストボディからメールアドレスを取得
  const { email } = await readBody(event)
  if (!email) {
    throw createError({ statusCode: 400, statusMessage: 'Invalid Request' })
  }

  // ユーザIDを生成
  const id = randomUUID()

  // PublicKeyCredentialCreationOptionsJSONを生成する
  // ここで生成したPublicKeyCredentialCreationOptionsJSONはクライアント側でstartRegistration()に渡す
  const options = await generateRegistrationOptions({
    rpName: 'PassKeyDemo',
    rpID: 'localhost',
    userID: isoUint8Array.fromUTF8String(id),
    userName: email,
    attestationType: 'none',
    authenticatorSelection: {
      userVerification: 'preferred',
      residentKey: 'required'
    }
  })

  // ユーザ情報を保存
  saveUser({ id, email })

  // challenge保存
  await event.context.session.update({ challenge: options.challenge })

  // PublicKeyCredentialCreationOptionsJSONを返却
  return options
})続けて、AuthenticatorAttestationResponse を受け取り検証するエンドポイントを追加します。
今回は POST /api/auth/register/verify とします。
// server/api/auth/register/verify.post.ts
import { verifyRegistrationResponse } from '@simplewebauthn/server'

export default defineEventHandler(async (event) => {
  // メールアドレスとAuthenticatorAttestationResponse)を取得
  const { email, attestationResponse } = await readBody(event)
  if (!email || !attestationResponse) {
    throw createError({ statusCode: 400, statusMessage: 'Invalid Request' })
  }

  // 保存しておいたchallengeを取得
  const { challenge } = event.context.session.data
  if (!challenge) {
    throw createError({ statusCode: 400, statusMessage: 'Invalid Request' })
  }

  // DBからユーザ情報を取得
  const user = getUserByEmail(email)
  if (!user) {
    throw createError({ statusCode: 400, statusMessage: 'Invalid Request' })
  }

  // リクエストを検証
  const { verified, registrationInfo } = await verifyRegistrationResponse({
    response: attestationResponse,
    expectedChallenge: challenge,
    expectedOrigin: 'http://localhost:3000',
    expectedRPID: 'localhost',
  })

  // 検証に成功したらDBに保存
  if (verified && registrationInfo) {
    saveUser({
      ...user,
      credential_id: registrationInfo.credential.id,
      public_key: registrationInfo.credential.publicKey,
      counter: registrationInfo.credential.counter,
    })
  }

  // セッションからchallengeを削除
  await event.context.session.update({ challenge: undefined })

  // 検証結果を返す
  return { verified }
})
これで登録フローの実装は完了です。
認証フロー
続いて、認証フローの実装になりますが認証フローは大まかには下記のような流れになります。
Authentication Flow
https://w3c.github.io/webauthn/#sctn-api

- ユーザがログインボタン等をクリックして、認証フローがスタートします
- サーバーはクライアントに
PublicKeyCredentialRequestOptionsを返します - クライアントは受け取った
PublicKeyCredentialRequestOptionsを使ってWebAuthn APIを経由で認証器を呼び出します - 認証器はユーザの認証(生体認証など)を実行
- 認証器はクライアントに
AuthenticatorAttestationResponseを返します - クライアントは受け取った
AuthenticatorAttestationResponseをサーバーに送信します - サーバーは送られてきた
AuthenticatorAttestationResponseを検証し、問題なければログイン処理を行う
こちらも主に実装するのは 0, 1, 5, 6 の部分になります。
それでは実装に入りましょう。
クライアント側(RP Javascript)
先ほど登録フローで作成した画面にログインボタンとログイン用の処理を追加します。
// app.vue
<script setup lang="ts">
import { startRegistration, startAuthentication } from '@simplewebauthn/browser'

// 省略

const login = async (email: string): Promise<void> => {
  // PublicKeyCredentialRequestOptionsを取得する
  const options = await $fetch('/api/auth/login/options', {
    method: 'POST',
    body: { email },
  })

  // WebAuthnAPI経由で認証器に認証リクエストを送信
  // startAuthenticationは内部でnavigator.credentials.get()を呼び出す
  // 認証器はユーザ検証(本人確認)を行う
  const assertionResponse = await startAuthentication({ optionsJSON: options })

  // assertionResponseを送信して認証する
  const { verified } = await $fetch('/api/auth/login/verify', {
    method: 'POST',
    body: {
      email,
      assertionResponse,
    },
  })

  // 認証に失敗したらアラートを表示して終了
  if (!verified) {
    alert('ログイン失敗')
    return
  }

  // 認証が成功したら保護されたページに遷移
  await navigateTo('/protected', { external: true })
}
</script>

<template>
  <div class="container">
    <h1 class="title">Passkey 認証デモ</h1>
    <label class="label">ユーザー名</label>
    <input
        v-model="username"
        type="text"
        placeholder="demo@example.com"
        class="input"
    />
    <button
        @click="register(username)"
        class="button register"
        :class="{
          disabled: !isUserNameValid
        }"
        :disabled="!isUserNameValid"
    >🔐 パスキー登録</button>
    <button
        v-if="false"
        @click="login(username)"
        class="button login"
        :class="{
          disabled: !isUserNameValid
        }"
        :disabled="!isUserNameValid"
    >➡️ ログイン</button>
  </div>
</template>

<style scoped>
// 省略
</style>
追加した部分を簡単に解説すると、
- ログインボタンを押して
login()を実行 - サーバーに
PublicKeyCredentialRequestOptionsを要求する - サーバーから受け取った
PublicKeyCredentialRequestOptionsを使ってSimpleWebAuthnのstartAuthentication()を呼び出すstartAuthentication()は内部的にはnavigator.credentials.get()を呼び、認証器に認証情報をリクエスト- 認証器により認証が要求されるので認証する
- 認証が通ると
startAuthentication()がAuthenticatorAssertionResponseを返す
- 受け取った
AuthenticatorAssertionResponseをサーバーに送信して検証とログイン処理をしてもらう
という処理の流れになっています。
サーバー側(RP Server)
次にサーバー側で PublicKeyCredentialRequestOptions を返すエンドポイントを実装します。
今回は POST /api/auth/login/options というパスで作成します。
// server/api/auth/login/options.post.ts
import { generateAuthenticationOptions } from '@simplewesbauthn/server'

export default defineEventHandler(async (event) => {
  // リクエストボディからメールアドレスを取得
  const { email } = await readBody(event)
  if (!email) {
    throw createError({ statusCode: 400, statusMessage: 'Invalid Request' })
  }

  // DBからユーザ情報を取得
  const user = getUserByEmail(email)
  if (!user || !user.credential_id) {
    throw createError({ statusCode: 400, statusMessage: 'Invalid Request' })
  }

  // PublicKeyCredentialRequestOptionsJSONを生成する
  const options = await generateAuthenticationOptions({
    rpID: 'localhost',
    allowCredentials: [
      { id: user.credential_id },
    ],
    userVerification: 'preferred',
  })

  // challenge保存
  await event.context.session.update({ challenge: options.challenge })

  // PublicKeyCredentialRequestOptionsJSONを返却
  return options
})
続けて、 AuthenticatorAssertionResponse を受け取り検証するエンドポイントを追加します。
今回は POST /api/auth/login/verify とします。
// server/api/auth/login/verify/post.ts
import { verifyAuthenticationResponse } from '@simplewebauthn/server'

export default defineEventHandler(async (event) => {
  // メールアドレスとAuthenticatorAssertionResponseを取得
  const { email, assertionResponse } = await readBody(event)
  if (!email || !assertionResponse) {
    throw createError({ statusCode: 400, statusMessage: 'Invalid Request' })
  }

  // 保存しておいたchallengeを取得
  const { challenge } = event.context.session.data
  if (!challenge) {
    throw createError({ statusCode: 400, statusMessage: 'Invalid Request' })
  }

  // DBからユーザ情報を取得
  const user = getUserByEmail(email)
  if (!user?.credential_id || !user?.public_key || user?.counter === undefined) {
    throw createError({ statusCode: 400, statusMessage: 'Invalid Request' })
  }

  // リクエストを検証
  const { verified, authenticationInfo } = await verifyAuthenticationResponse({
    response: assertionResponse,
    expectedChallenge: challenge,
    expectedOrigin: 'http://localhost:3000',
    expectedRPID: 'localhost',
    credential: {
      id: user.credential_id,
      publicKey: user.public_key,
      counter: user.counter,
    },
  })

  // 検証に成功した場合
  if (verified) {
    // counterを更新
    saveUser({ ...user, counter: authenticationInfo.newCounter })

    // セッションにログインユーザのIDをセット
    await event.context.session.update({
      userId: user.id,
      challenge: undefined,
    })
  }

  // 検証結果を返す
  return { verified }
})
これで認証フローの実装も完了しました。
動作確認
登録
ブラウザで http://localhost:3000 を開くと、トップページが表示されます。
ユー�ザ名(メールアドレス)を入力し、「パスキー登録」ボタンを押します。
ブラウザが指紋認証を要求するので認証する。
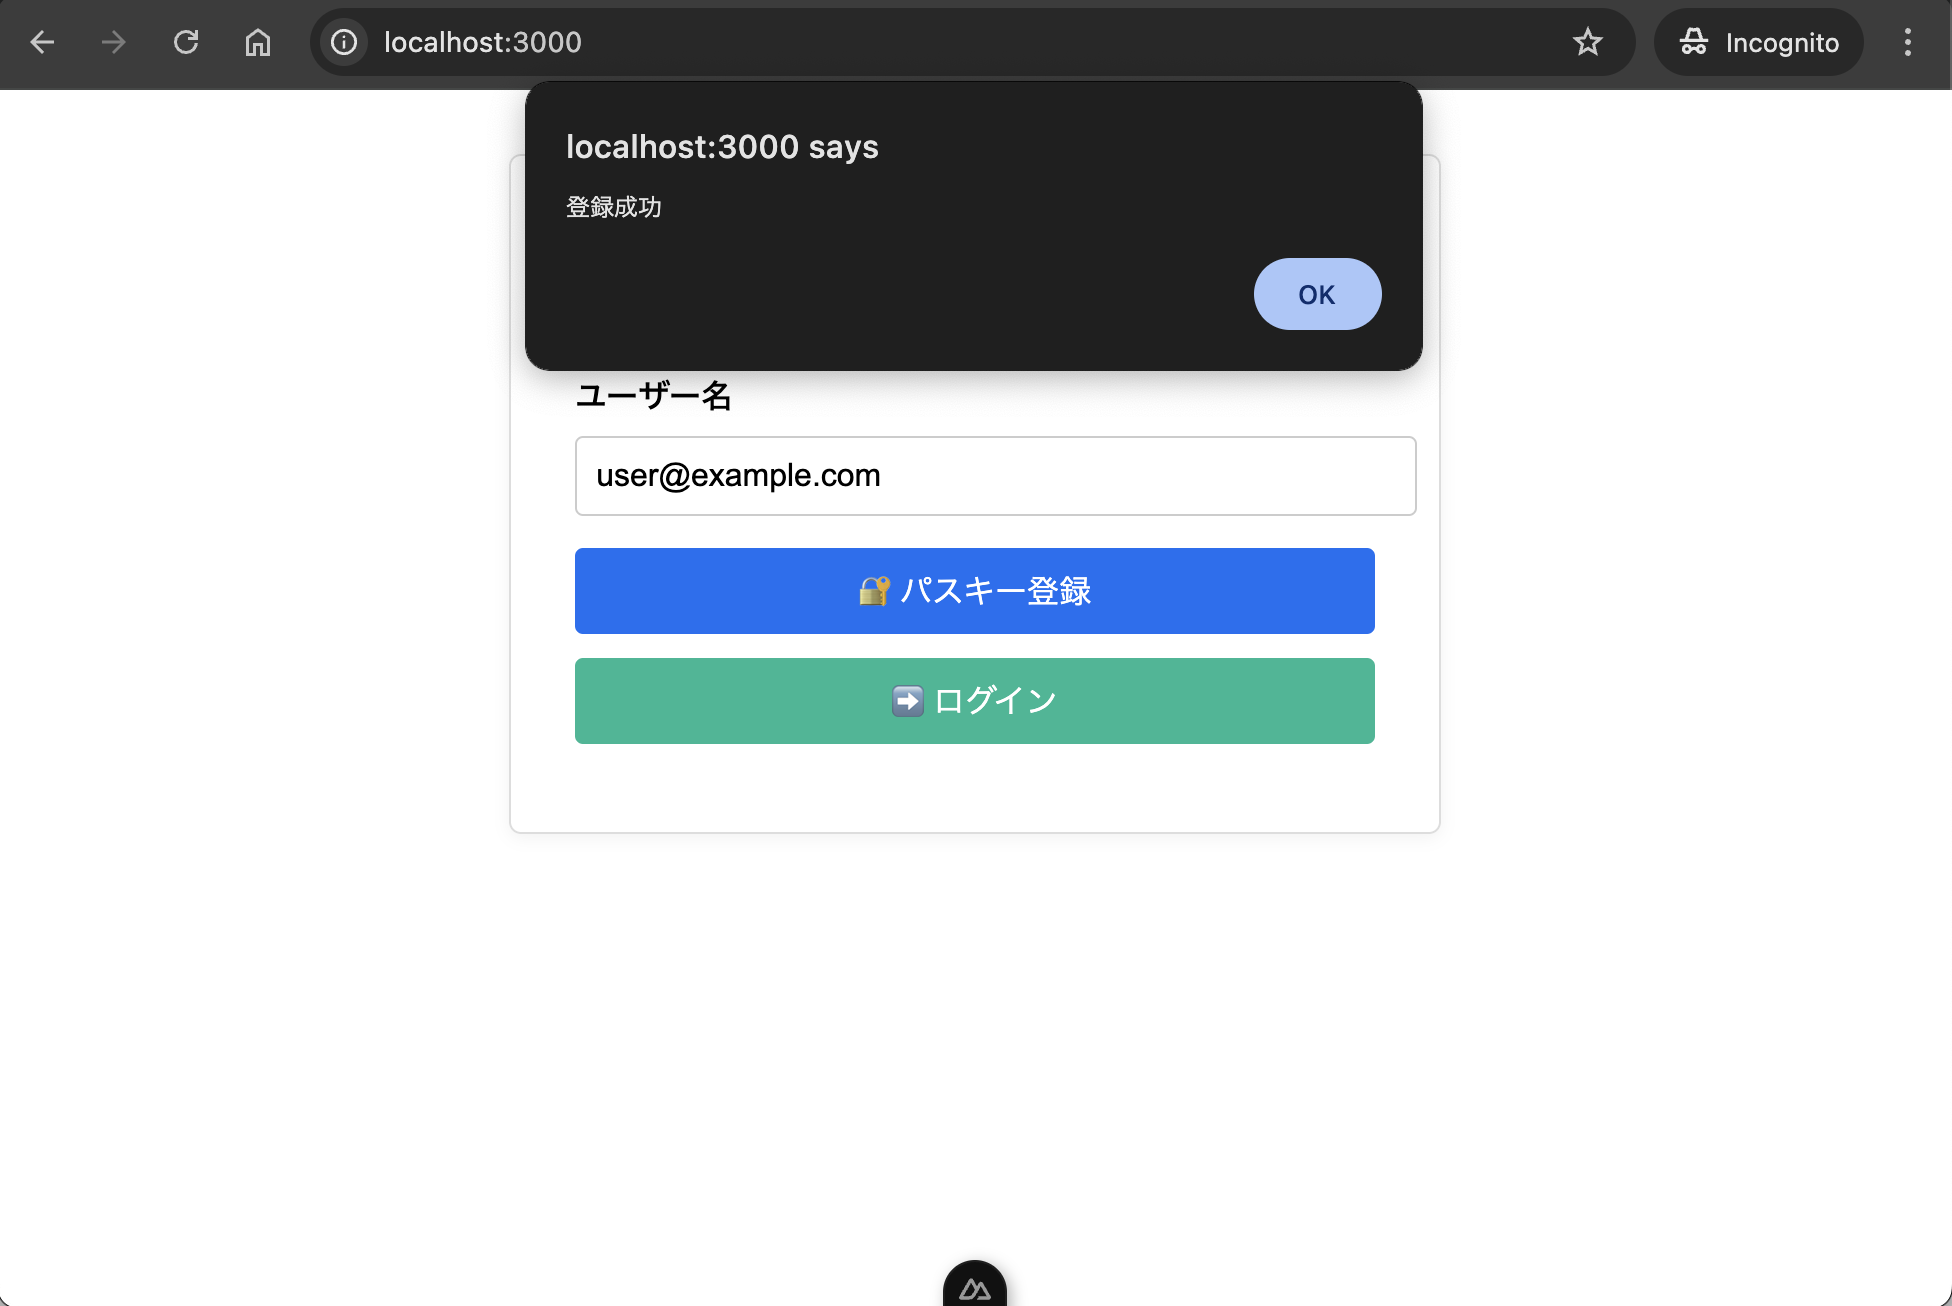
「登録成功」と表示されたらPasskeyの登録完了です。
ログイン
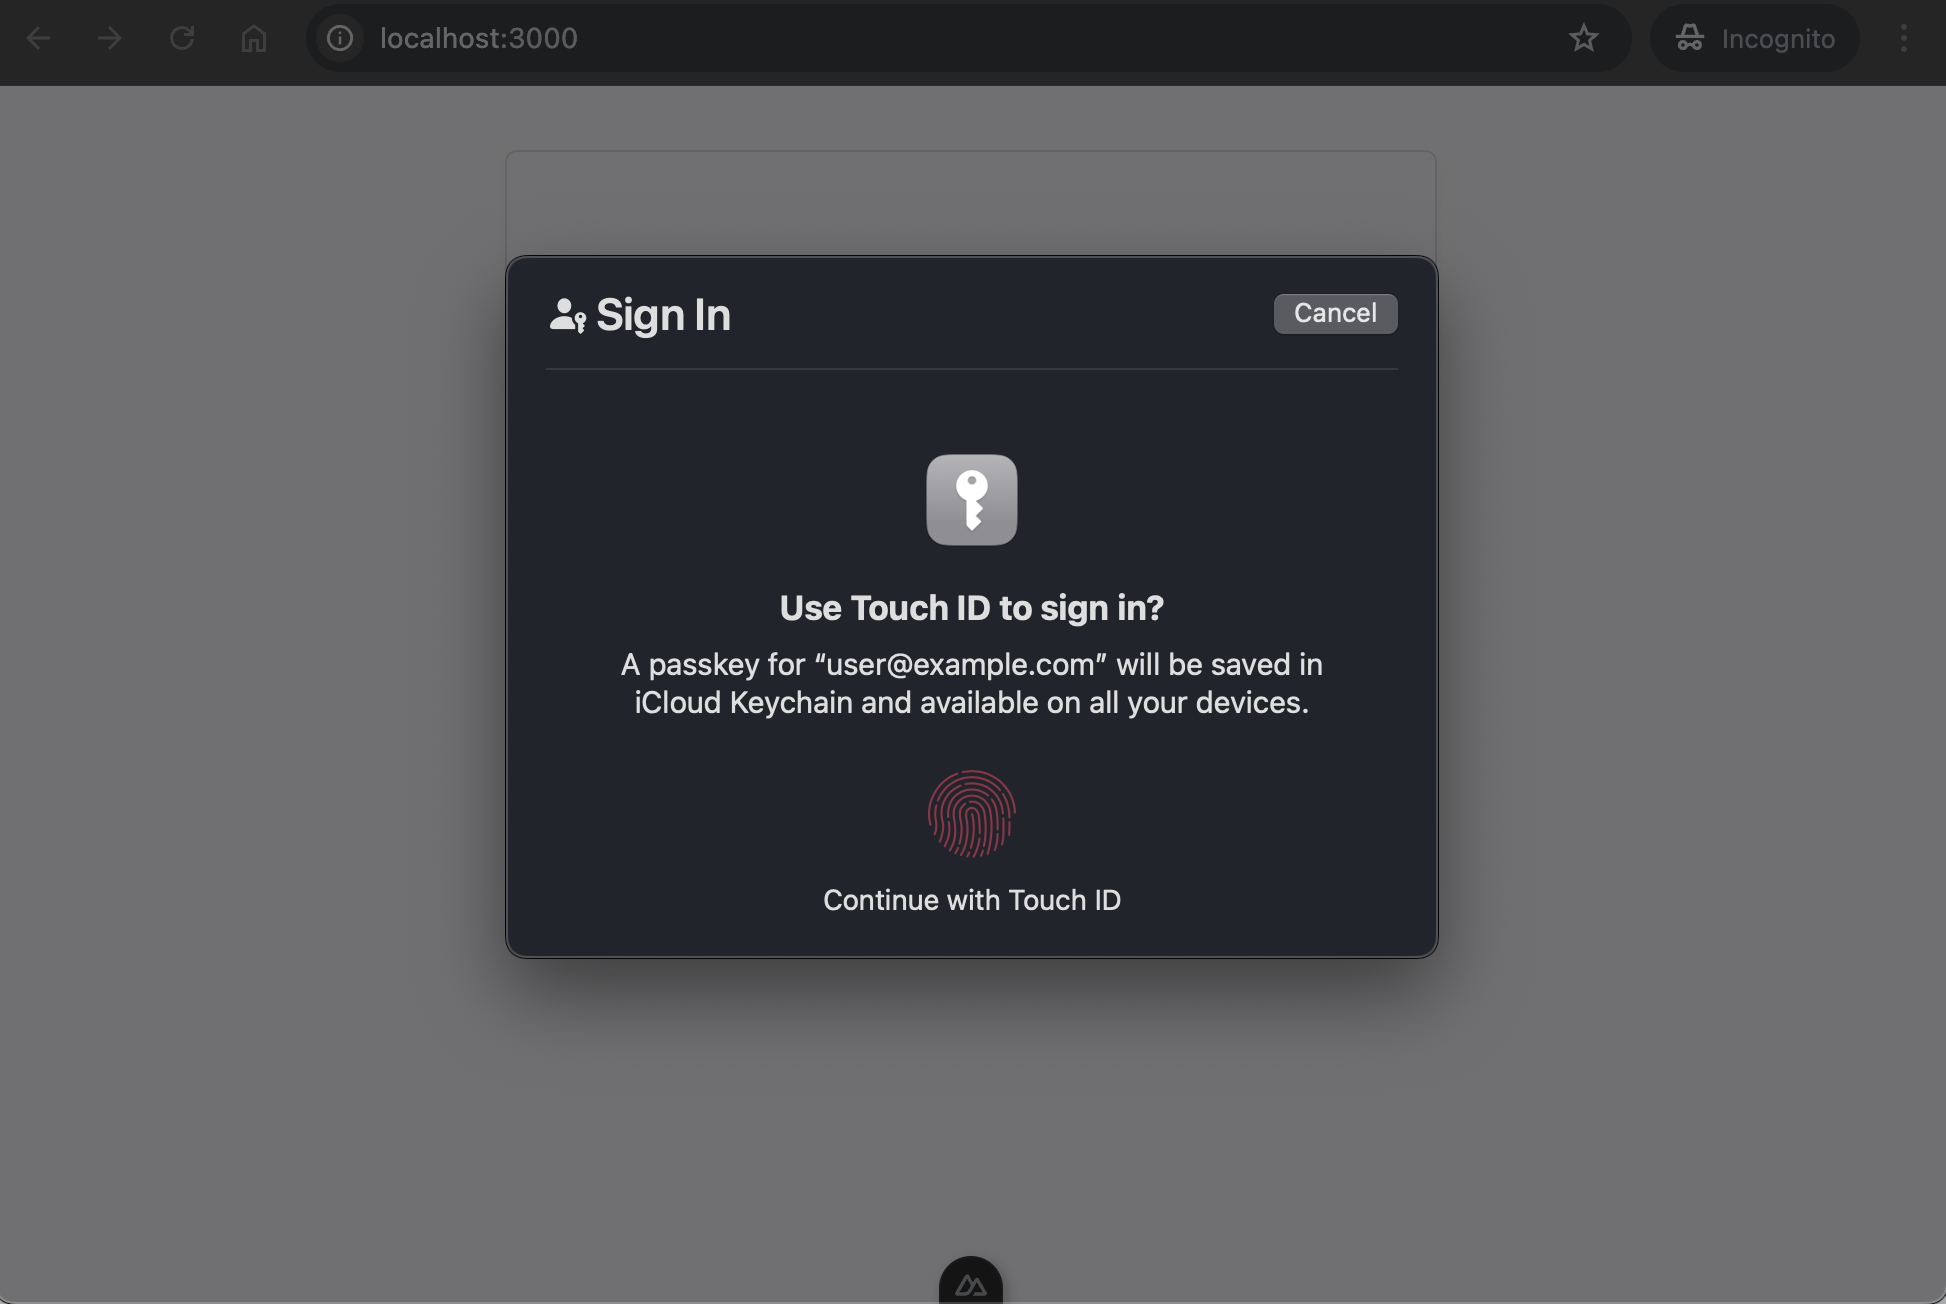
ユーザ名(メールアドレス)が入力されている事を確認して「ログイン」ボタンを押します。
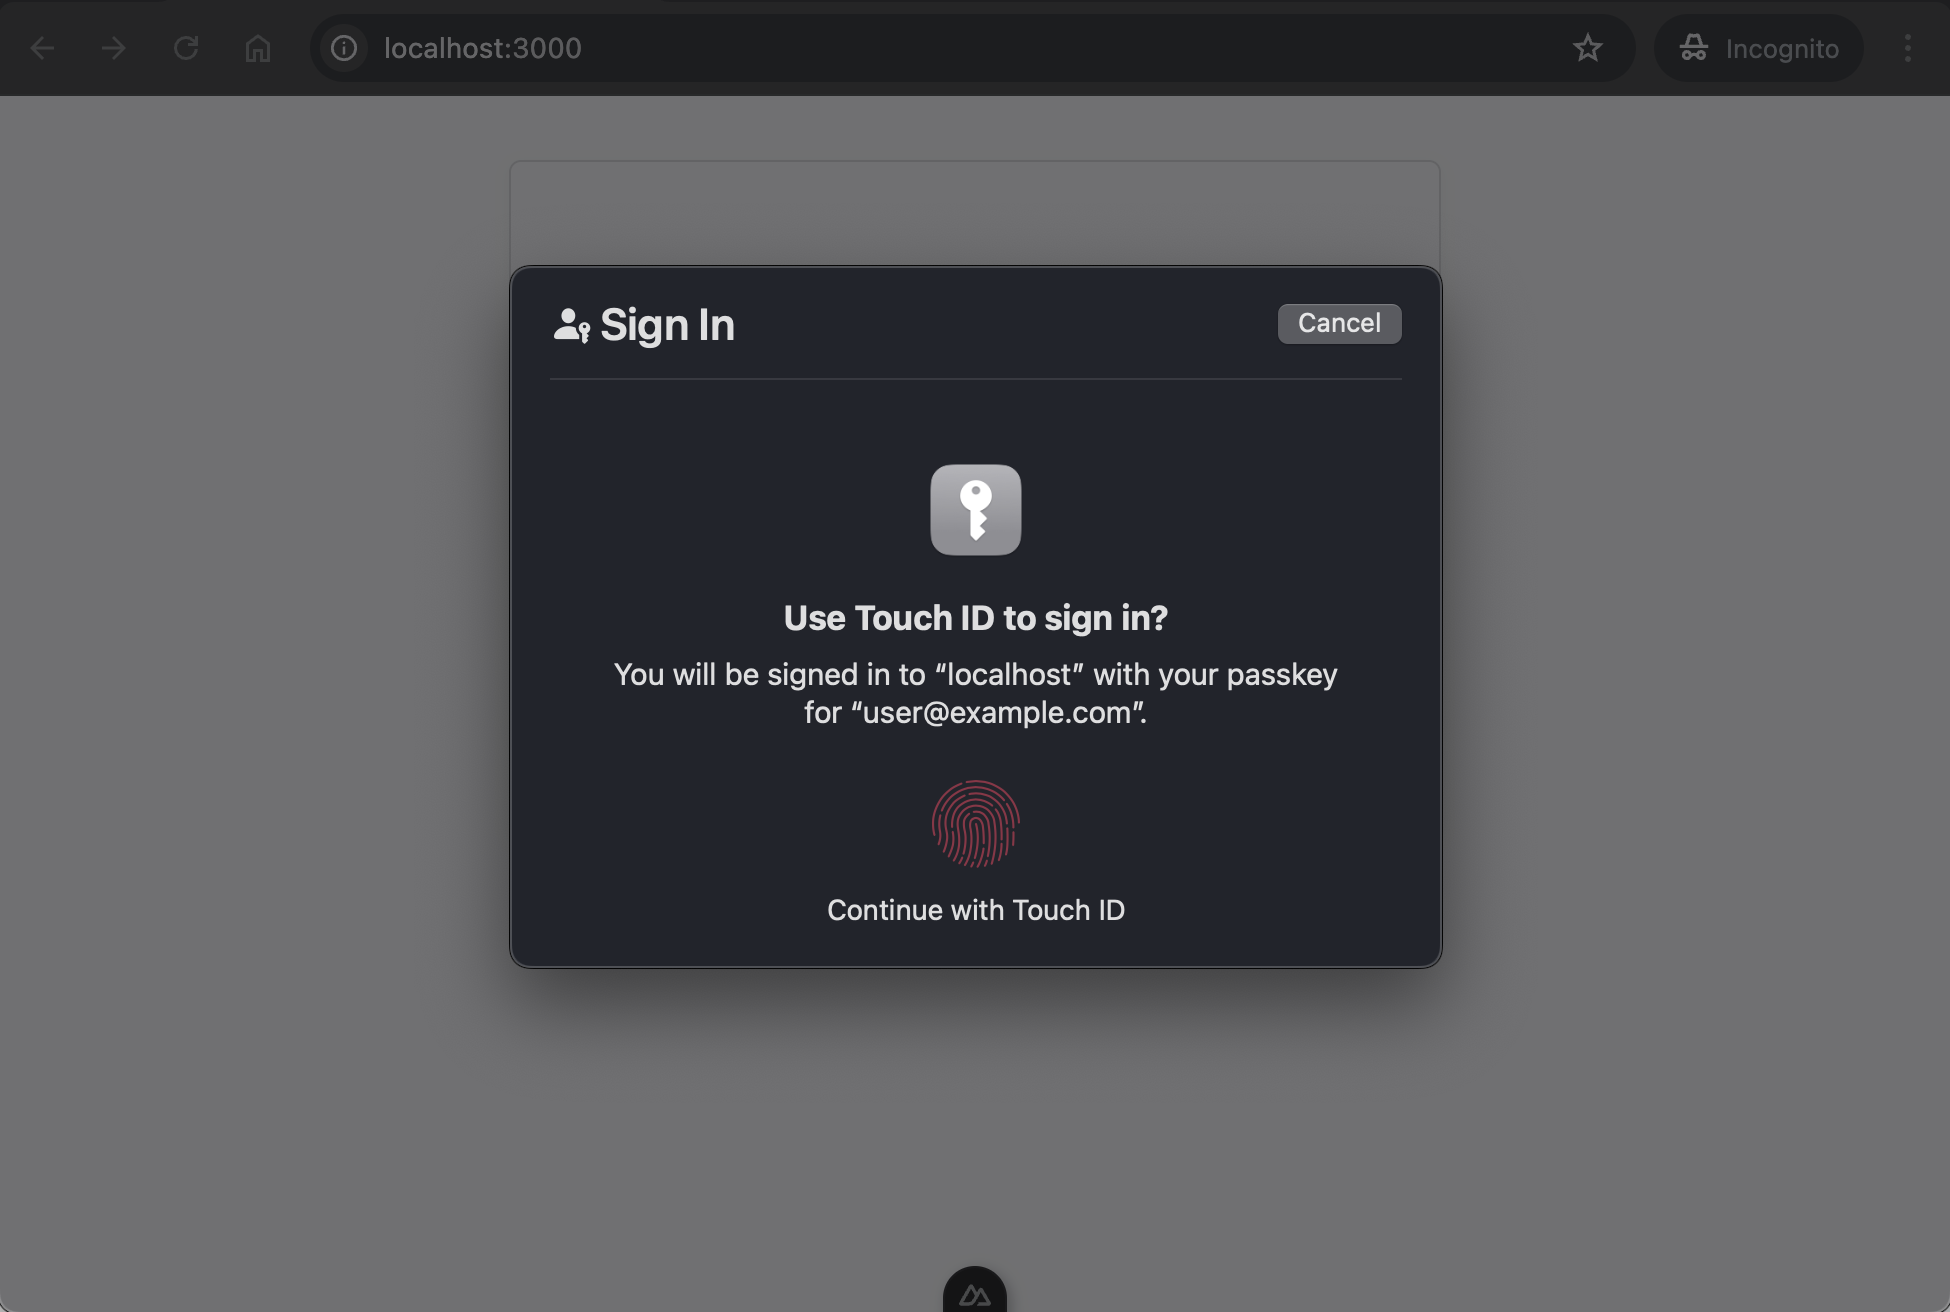
ブラウザが指紋認証を要求するので認証する。
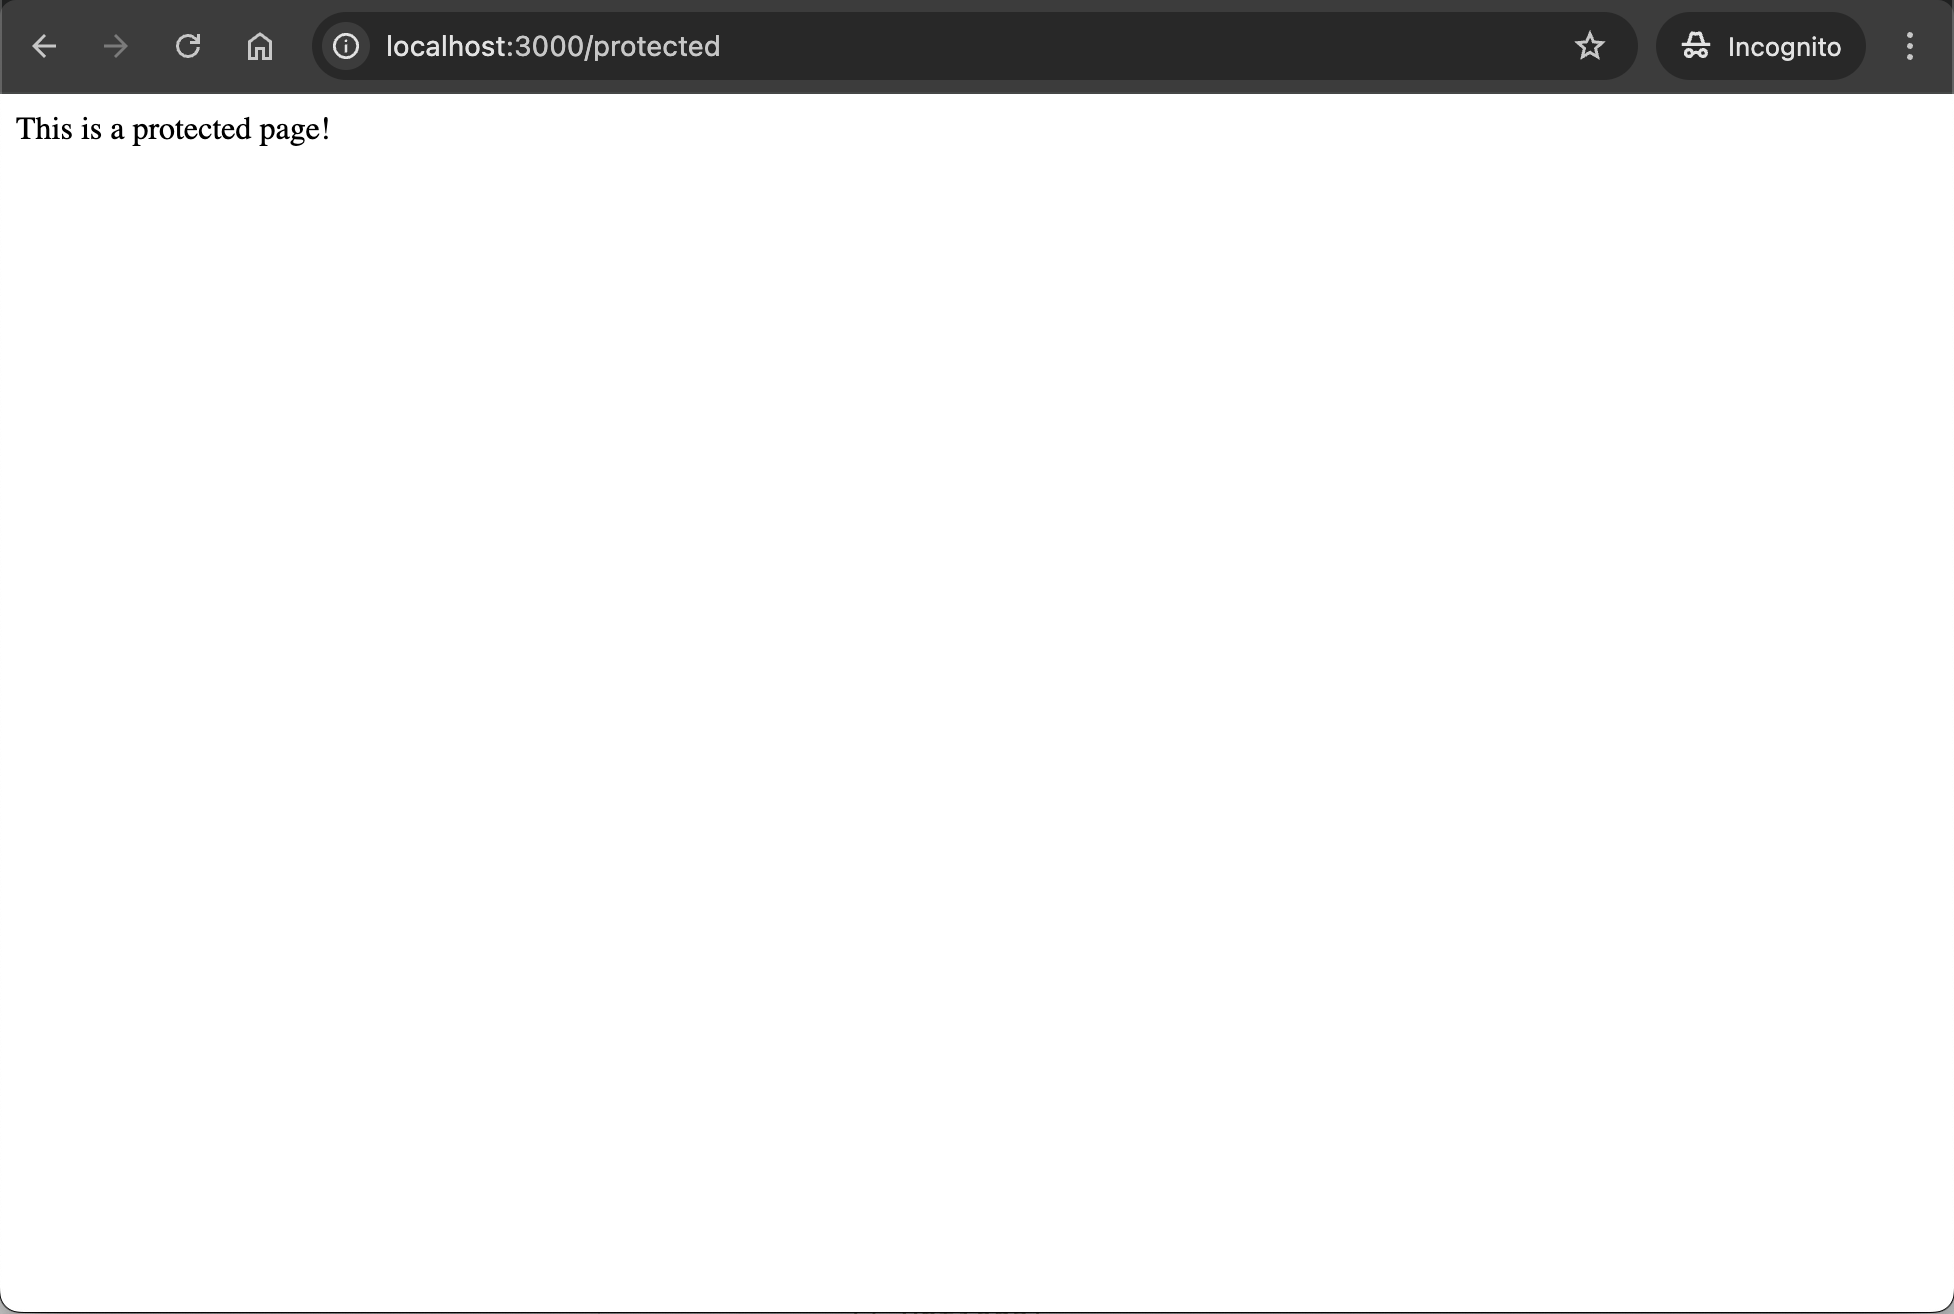
指紋認証を済ませるとログインが成功し、保護されたページにリダイレクトされます。
保護されたページが表示されればログイン成功です。
おわりに
パスワードマネージャーなどの手段もありますが、パスワードの管理ってやっぱり面倒ですよね。
そんな中で登場したPasskeyのようなパスワードレス認証は、今後もっと広まっていってほしい技術だと感じています。
まだ発展途上な部分はありますが、一度この便利さを体験すると、従来のパスワード認証にはもう戻れなくなるかもしれません。
今回紹介した実装コードはGitHubに公開していますので、興味がある方はぜひチェックしてみてください。
https://github.com/juntkg/blog-202504


